Click here to see a listing of beads
Huichol Bracelet Tutorial
I've started exploration in Huichol beading, a netting stitch unique to the Huichol Indians of Mexico. It has a distinctive style that includes gradations of color in geometric designs, and unlike Native American beadwork, this Huichol-style pattern does not require a loom, and can be done with a single needle.
It took me quite a bit of research to find any information on this technique, so my version may not be 100% true to the original. However, the look of the pattern is correct. I had found a description of this stitch being executed with two needles, but only one is needed. I also had difficulty with the first beads I purchased from a local bead store, but later learned that the Huichol artists use Czech 11/0 Preciosa Ornelo Rocaille beads exclusively. I purchased mine from Shipwreck Beads, but also found them at Fire Mountain. Toho 11/0 seed beads also work well, but will result in a slightly larger pattern that is stretched slightly and may not end up with the correct size on bracelet patterns.
I have seen two different methods of creating the Huichol netting stitch. This tutorial is for the first method, which results in neater bracelet edges but requires weaving back through the previous rows. The second version I will cover in a video. It is faster, but the edges have more of a lacy appearance on one side.
About the Thread Used
Huichol bracelets in some of the tutorials from Mexico use a different thread that I have not been able to identify—it says "Polymide" on a large spool. I used 10lb Fireline here in this tutorial. A stiffer thread will create earrings or bracelets that retain their shape a little better.
You want to make sure that your thread will fit through the holes of the beads. Size 11/0 Preciosa Rocaille Seed Beads have a minimum hole size of 0.60mm. 10lb Fireline is 0.20mm in diameter, so you can theoretically go through each bead three times. Preciosa publishes information about the size of their beads with this handy color chart.
I've also experimented with different needles. The "big eye" needle works well but can be a little tight when going back through beads on the third pass. I've found a twisted wire needle that works well, but makes a "zipping" noise as you go back through the beads and the tip of the needle is not a point. A size 10 beading needle works well, but is difficult to thread with this heavier thread. You might try the three needles and see if you prefer one over the others.
Material List
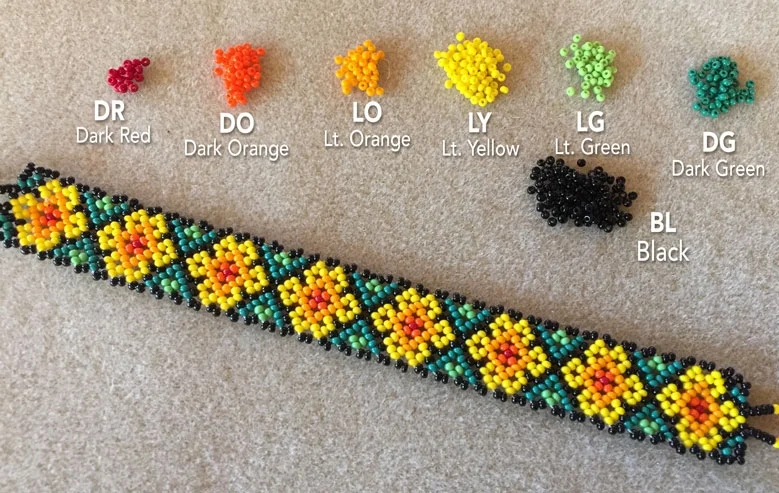
- Preciosa Rocaille beads, 11/0 in the following colors: black (BL), dark green (DG), light green (LG), light yellow (LY), light orange (LO), dark orange (DO), dark red (DR)
- WildFire Microfused Bonded Bead Weaving Thread, 0.20 mm diameter
- Size 12 beading needle, Big Eye needle, or twisted wire needle
- Bead mat (optional, but helpful)
- Sharp scissors
- Bead stops if available
Here are the Shipwreck Beads Product SKUs: Black (11SB109), Light Green (11SB180), Dark Green (11SB186), Light Yellow (11SB122), Light Orange (11SB132), Dark Orange (11SB134), Dark Red (11SB146). Click here for the list.
COPYRIGHT INFORMATION: This tutorial, all photos, and all diagrams are COPYRIGHTED, and may not be reproduced or sold without permission. If you are interested in using this tutorial, graphincs, or handout for teaching, please contact me directly. ©2016, Kat Kramer Adair.
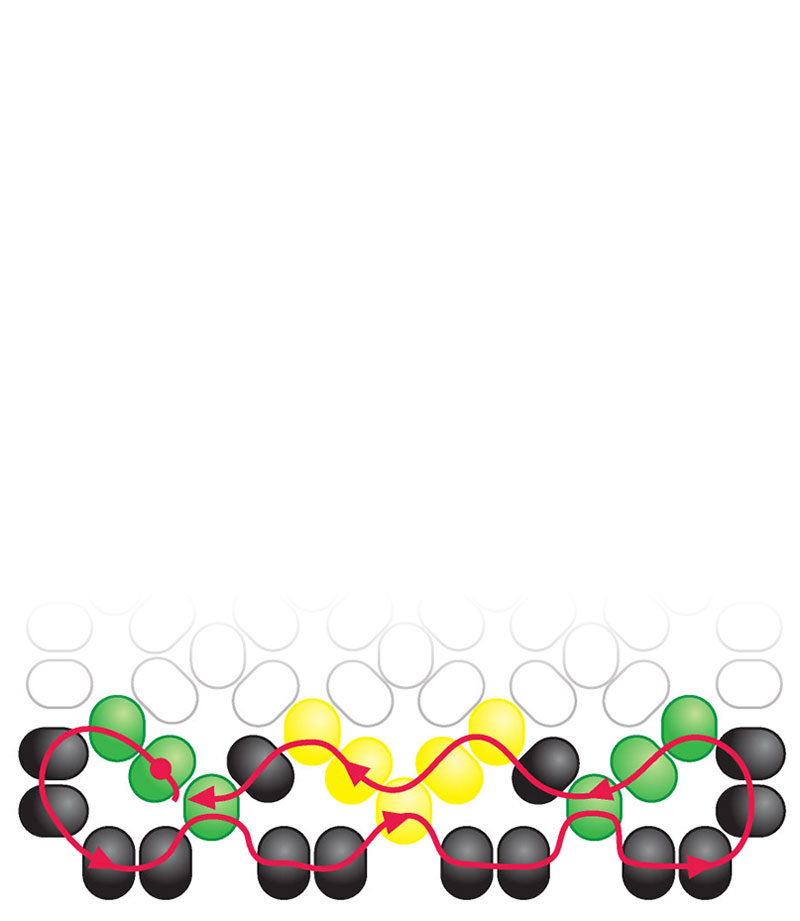
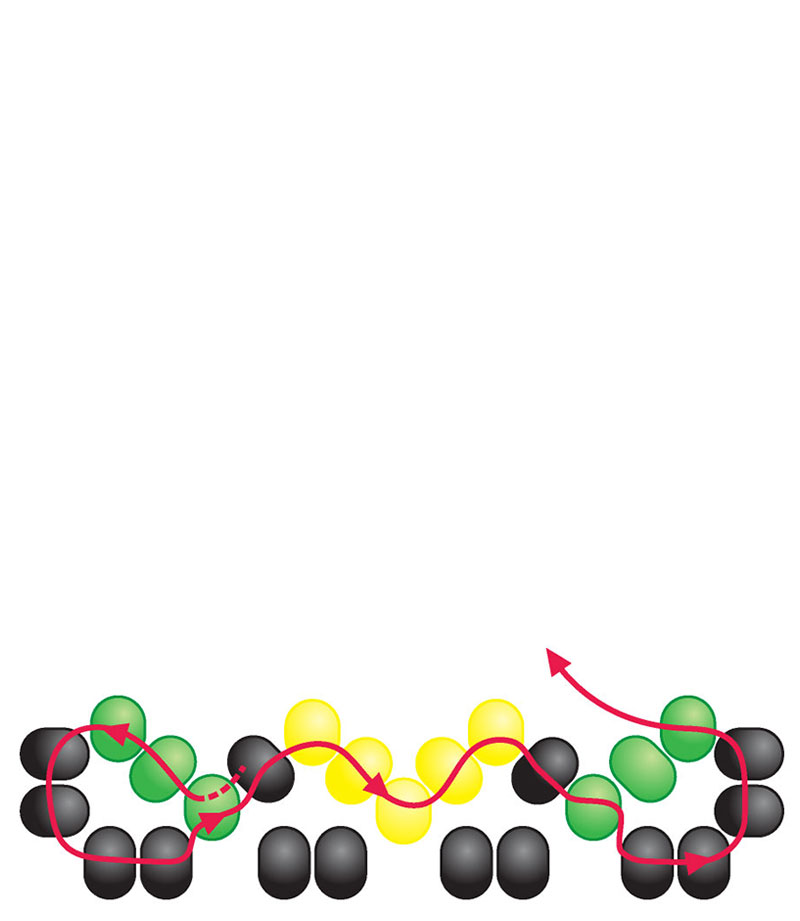
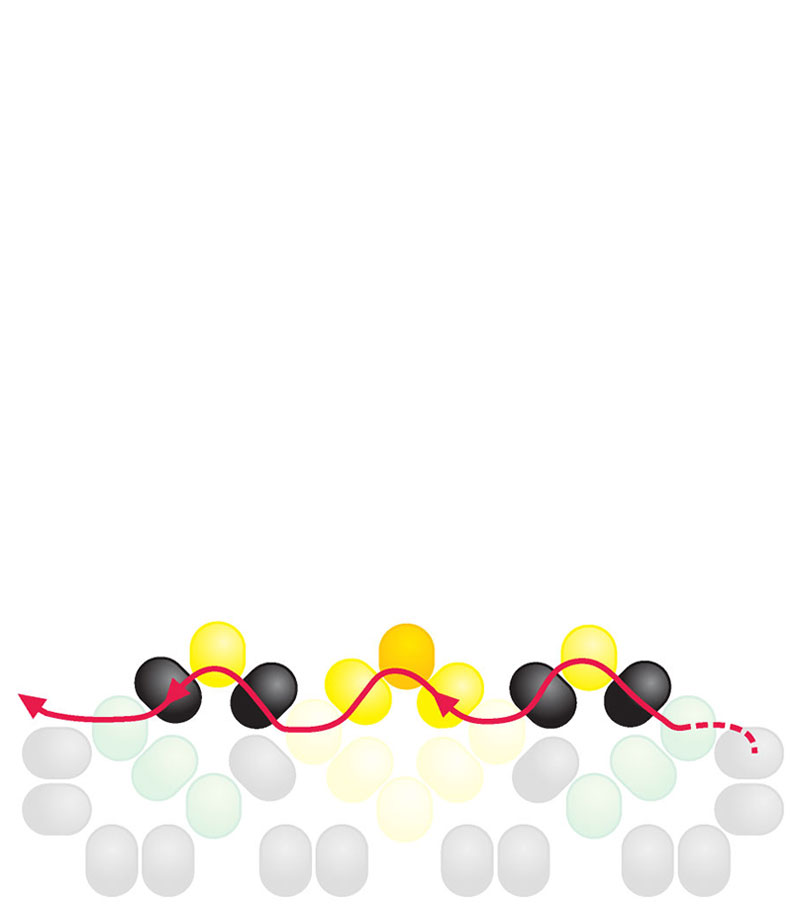
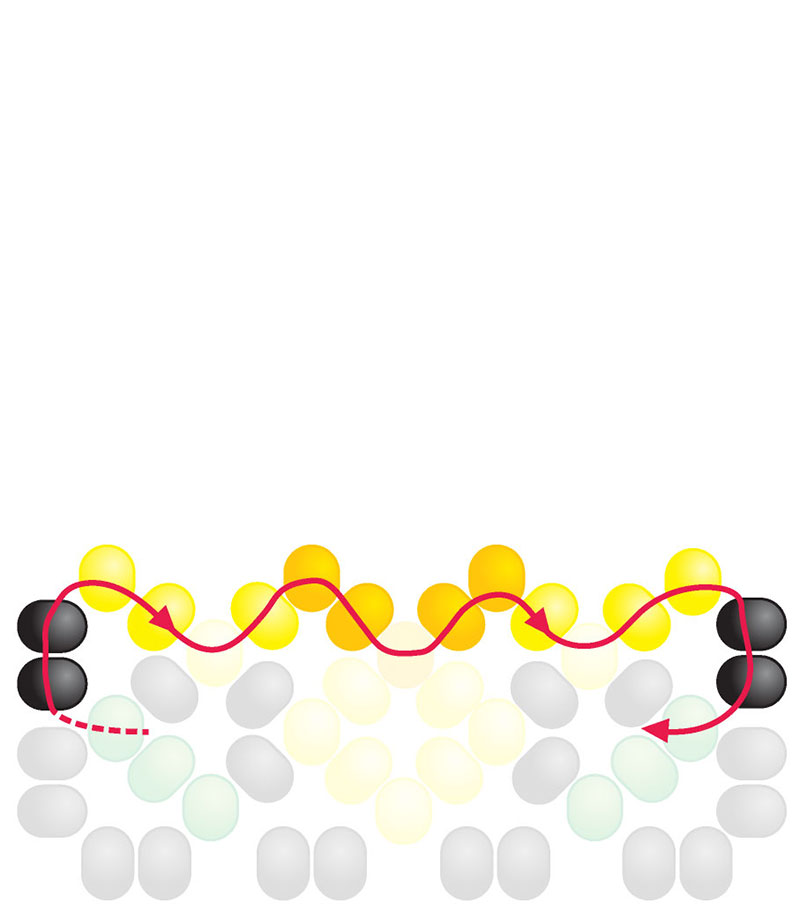
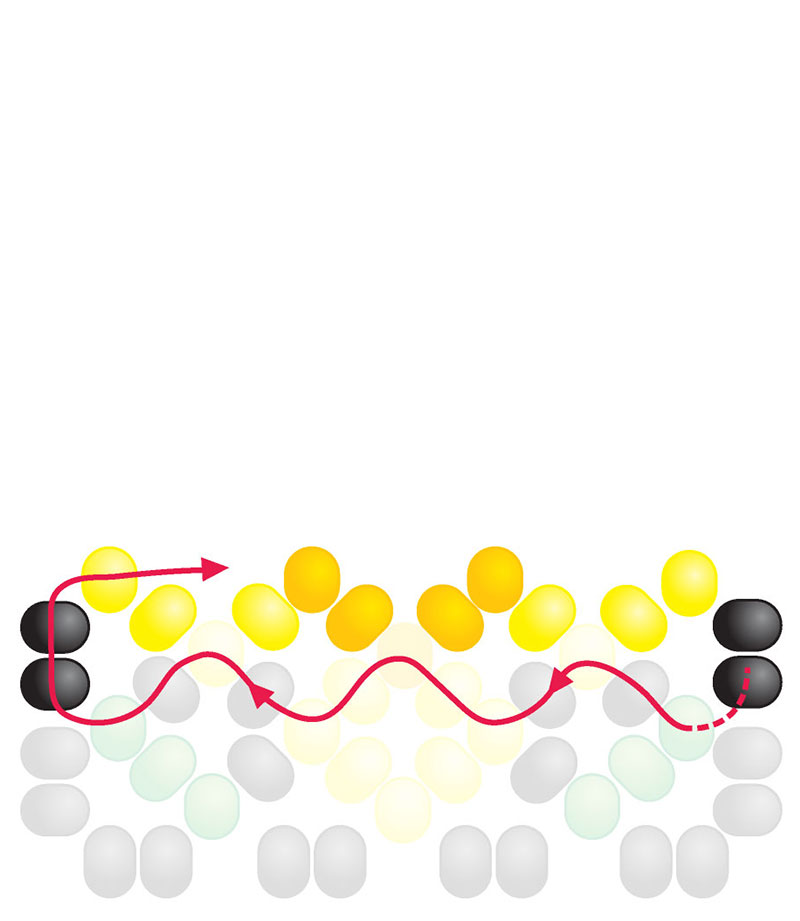
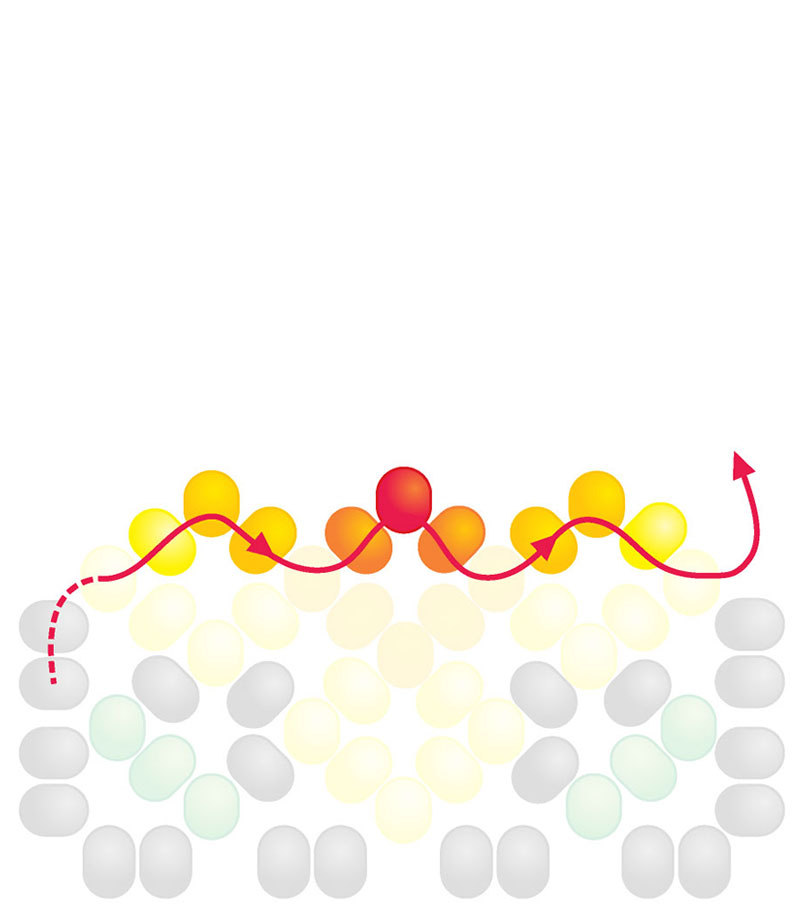
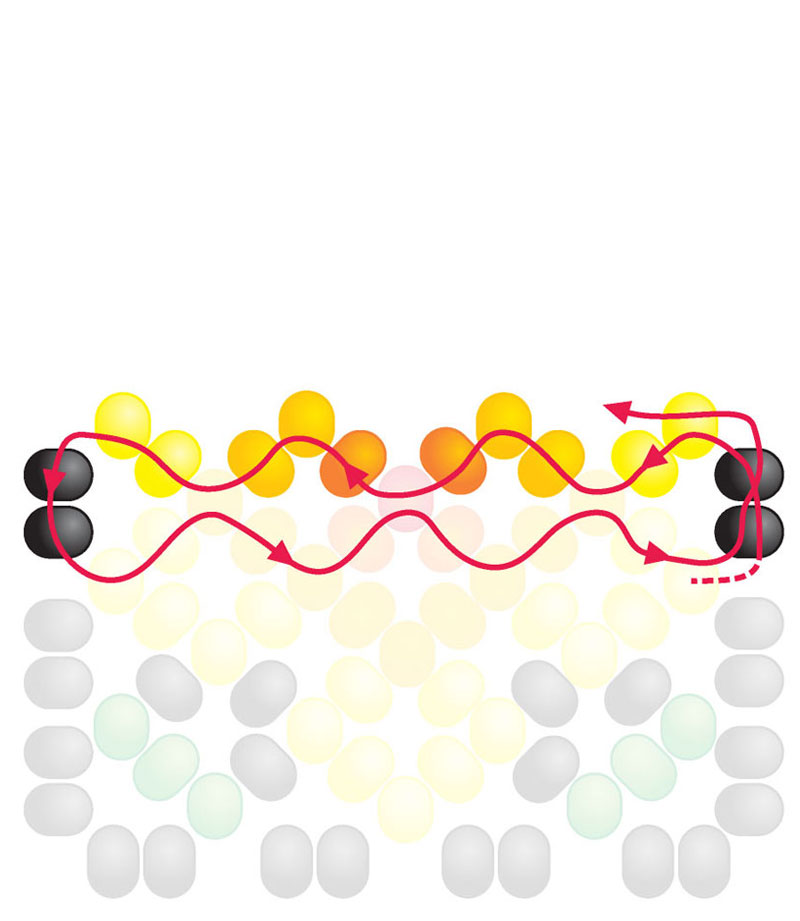
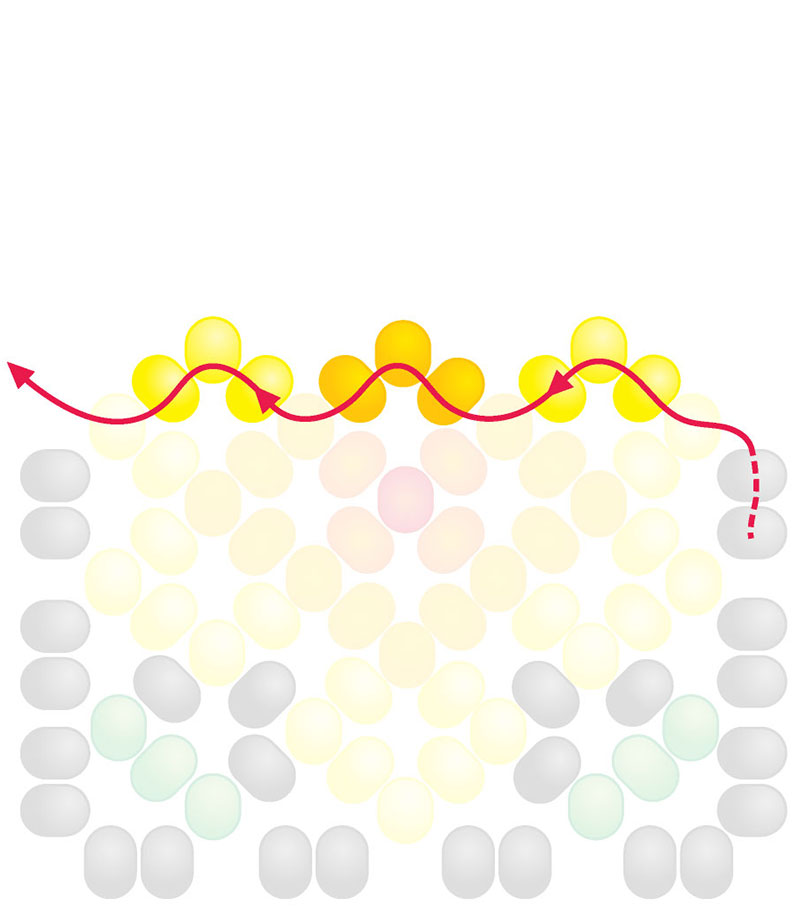
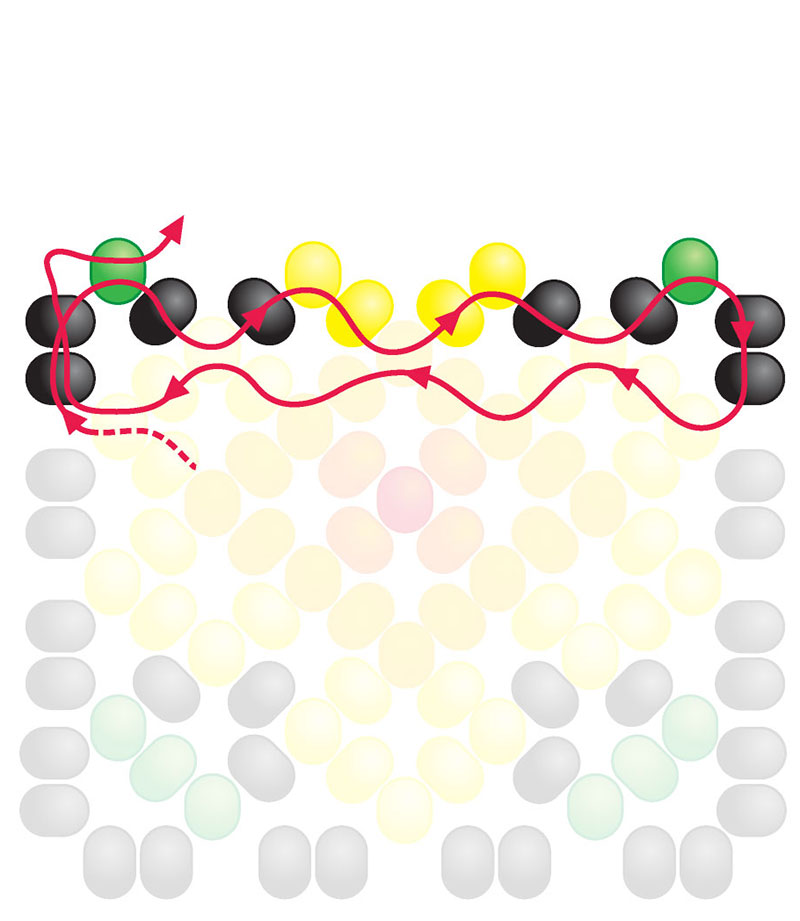
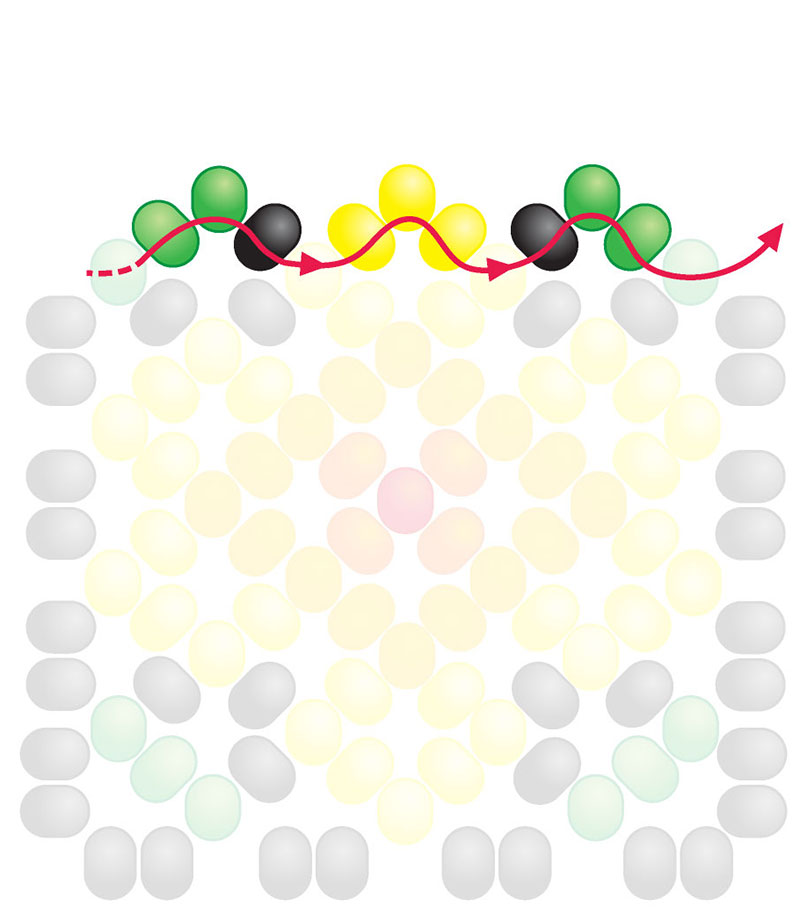
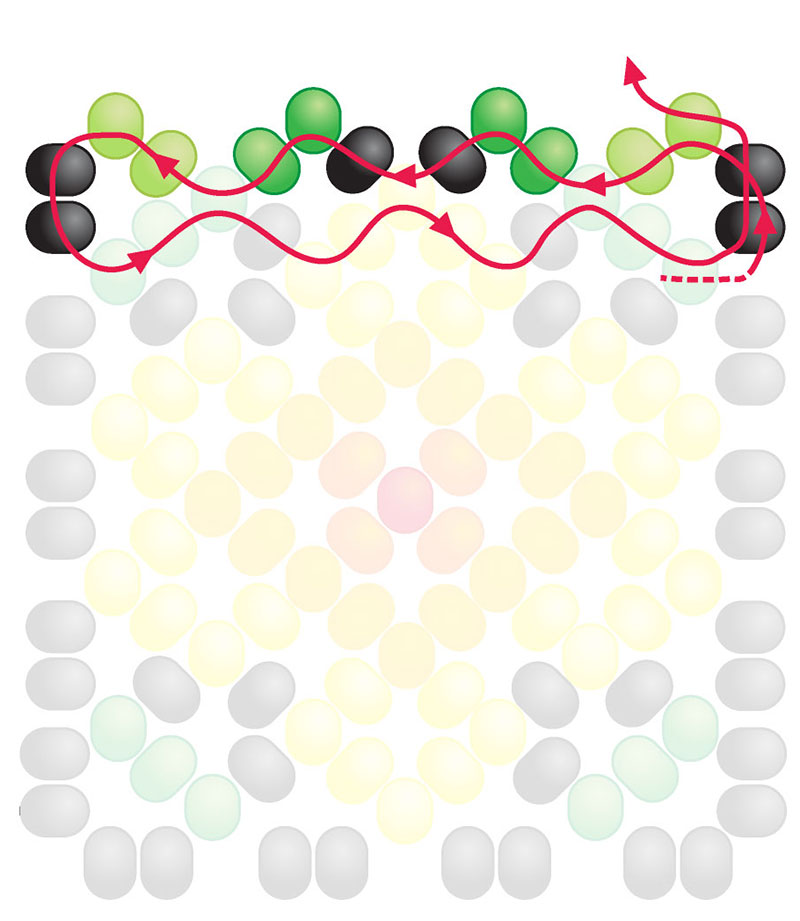
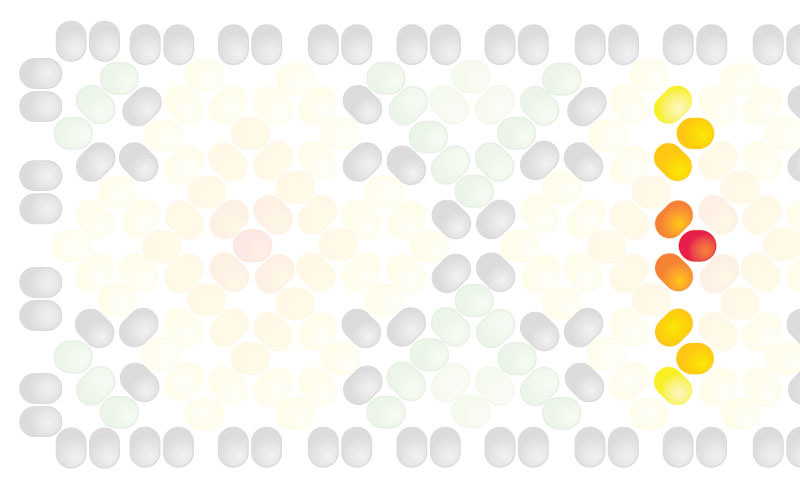
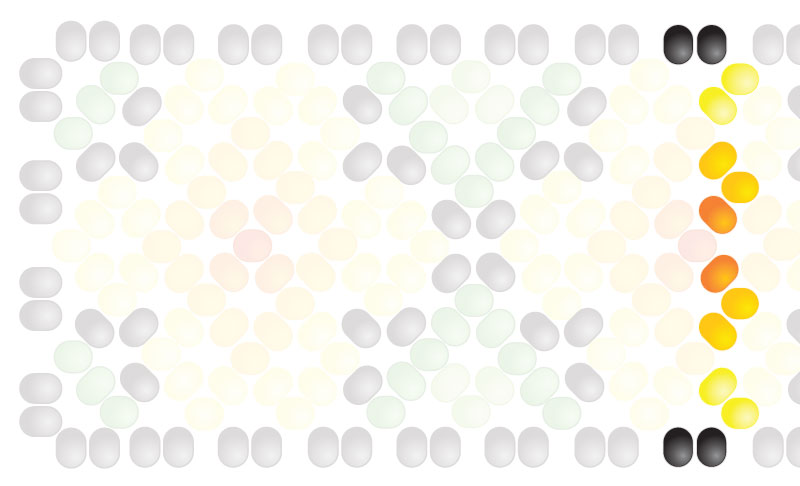
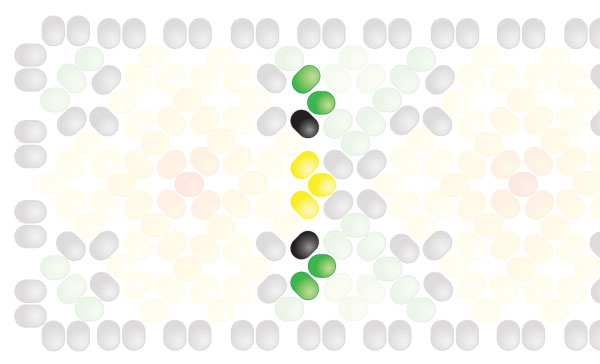
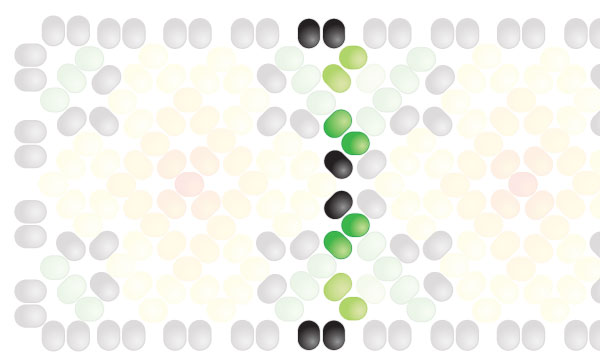
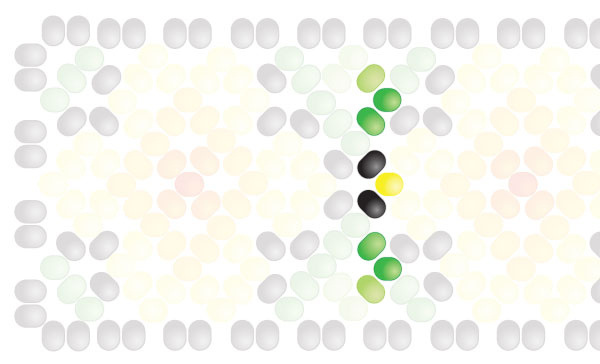
Thread Path Details
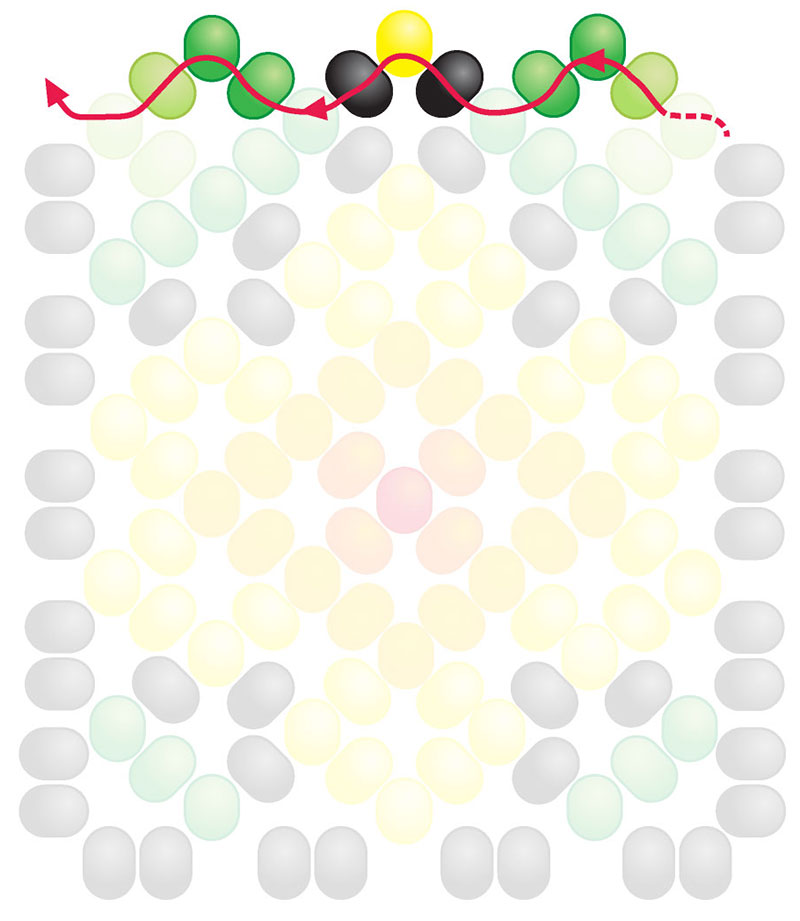
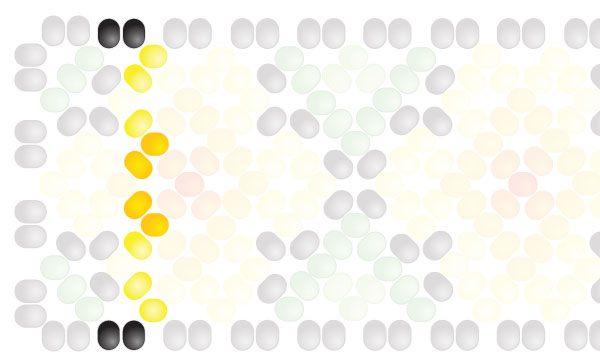
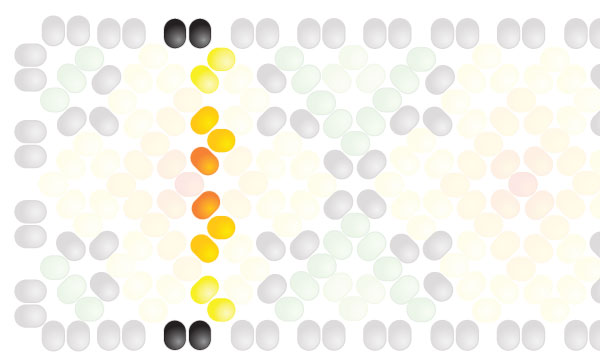
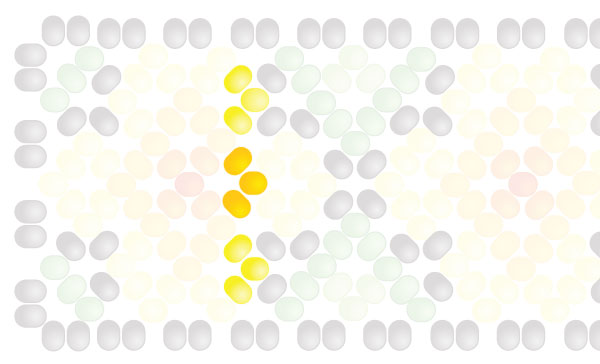
This image is a illustration experiment of advancing through the rows of the bracelet. Click the left/right arrows on the diagram to progress through the steps.
Each step will be explained in detail in the next section.
A list of beads used is listed at the bottom of each image except in the first two steps.
This is the overall pattern of the bracelet.
Rows 1 & 2
Cut a piece of Fireline that's comfortable to work with. I usually cut a piece about 5-6 feet, but you might work with a smaller piece. Thread the needle with the Fireline (I need my 5x Opti-Visor to do this!).
Fig 1: Creating a stop bead
Create a stop bead with the first dark green bead. Leave a tail that's a couple of inches, then pass the needle through the bead, then go back through the same hole again. Tighten the thread around the bead. This will prevent the other beads from coming off the thread.
I have also seen another tutorial/technique where a lighter is used to "ball up" the end of the thread.
Next, thread the rest of the beads as shown below. These will create the first two rows.
Fig 2: 2 DG – 4 BL – DG – 2 BL – LY – 2 BL – DG – 4 BL – 2 DG
The first rows are the most difficult. You'll want to leave a little slack as you're working on the first two rows...if you work too tightly, the end of the bracelet will be distorted.
Start by passing the needle through the first single dark green bead on the right.
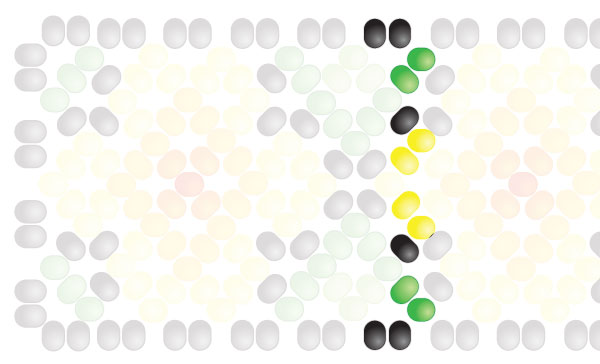
Fig 3
Next, thread a black bead (BL) and two light yellow beads (2 LY), pass the needle through the middle yellow bead, thread two light yellow beads (2 LY), then one black bead (BL), and pass the needle through the other dark green bead.
Pass the needle through the end of the stop bead and the next dark green bead, coming in from the end as shown.
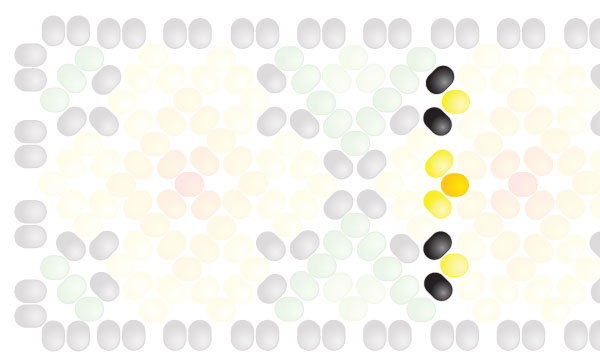
Fig 4: Adding BL – 2 LY, then 2 LY – BL
Pull the thread until the first rows start to take shape (Fig 5). At this point, the first two rows may twist and not lay right. We'll fix this when we add the third row. Now pass the needle through the beads as shown in Fig 6. Make sure that the thread is exiting the dark green bead as shown.
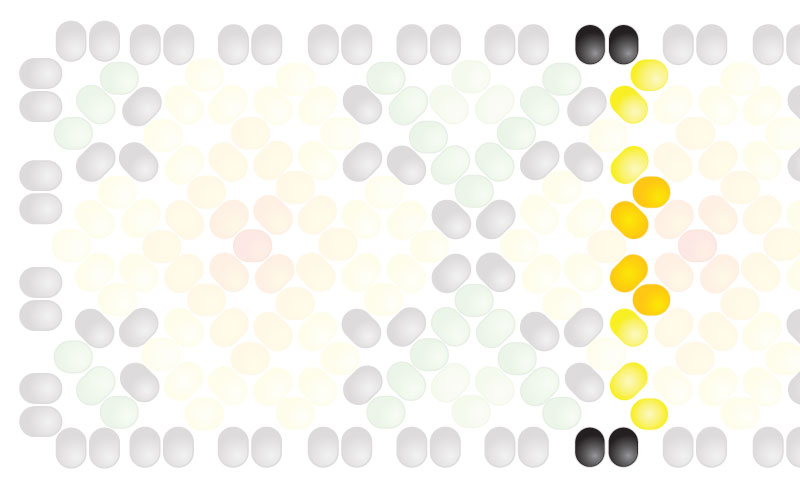
Fig 5: Pulling the pattern together (this is a different view of Fig 4)
Fig 6: Needling through beads to get back to starting position for Row 3
Row 3
Fig 7
Coming out of the dark green bead, add 1 BL, 1 LY, 1 BL, pass the needle through the middle light yellow bead of the previous row as shown in Fig 7.
Add 1 LY, 1 LO, 1 LY, then pass through the middle light yellow bead of the previous row.
Add 1 BL, 1 LY, 1 BL, then pass the needle through the dark green bead at the end as shown.
I'll turn the pattern to the side for the rest of the tutorial...
Fig 9
Row 4
Coming out of the dark green bead, you'll add four beads this time, because you're on the edge. On edges, you'll add two black beads that make up the edging, and two more beads.
Add 2 BL, 2LY, then pass the needle through the middle yellow bead in the previous row.
Add 1 LY, 2 LO, then pass through the middle light orange bead from the previous row.
Now you're reversing the pattern, so add 2 LO, 1 LY, then pass through the light yellow bead.
Add 2 LY, 2 BL, and pass the needle through the dark green bead at the end of the previous row. Pass the needle back and forth through the previous row's beads, then back through the two black edge beads and through the light yellow bead at the end, ready to start the next row.
Fig 8

Row 5
In row 5, add 1 LY, 2 LO, then pass through the LO in the previous row as shown. Add 1 DO, 1 DR, 1 DO, then pass through the LO in the previous row. The pattern now reverses, so add 2 LO, 1 LY, then pass the needle through the last LO.
Notice that the next row is an edge row, so it will have four beads that include the two black edge beads.
Row 6
In row 6, I'll combine the beading instructions and the weaving back through.
Coming out of the previous row's LY, add 2 BL, 2 LY, pass through the previous row's LO, add 2 LO, 1 DO, pass through the DR and reverse the pattern, adding 1 DO, 2 LO, pass through the LO, then add 2 LY, 2 BL. Pass the needle through the previous row's LO on the end.
Now weave through the previous row's beads as shown, coming out of the yellow bead, putting you back at the starting position for row 7.
You'll see that you've gotten to the center of the flower...the pattern now repeats backwards. Use the image below to follow the rows of beads.
Row 7
In row 7, coming from the previous row's LY, add 3 LY, pass through the previous row's LO, add 3 LO, pass through the next LO as shown, then add 3 LY, and go through the last LY in the previous row.
You'll notice that the addition of the three light orange beads completes the center orange diamond.
Row 8
Next, add 2 BL, 1 DG, 1 BL, then pass through the previous row's LY. Add 1 BL, 2 LY, then pass through the middle LO bead.
Reverse the pattern going back through. 2 LY, 1 BL, then back through the next LY. Add 1 BL, 1 DG, and 2 BL, then weave back through the previous row as shown, coming out through the two black beads and one green in preparation for the next row.
Row 9
Coming out of the last DG bead, add 2 DG, 1 BL, then pass through the light yellow bead on the previous row. Add 3 LY beads, then pass through the next light yellow bead. Reversing the pattern, add 1 BL, 2 DG beads and go through the last dark green bead.
Flip the piece vertically.
Row 10
Coming out of the DG bead, add 2 BL, 2 LG beads and go back through the dark green "point." Add 2 DG, 1 BL beads and go through the middle LY bead. Reverse the pattern, adding 1 BL, 2 DG beads, then go through the dark green bead. Now add 2 LG, 2 BL beads and go through the end dark green bead and weave back through to the starting position for the next row, coming out the light green bead at the bottom.
Row 11 (End of Repeat)
In this final row, you'll add 1 LG, 2 DG beads, then go through the DG bead from the previous row. Add 1 BL, 1 LY, 1 BL, then back through the next dark green bead as shown. Now add 2 DG, 1 LG and go out through the last LG bead.

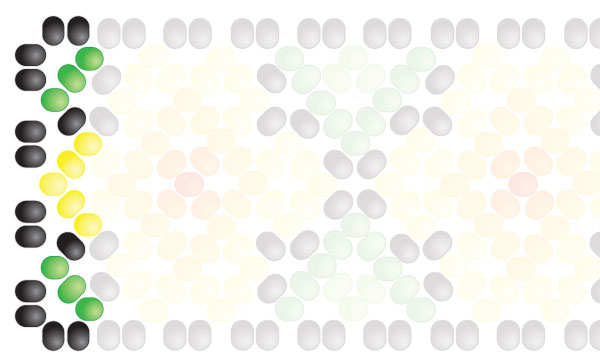
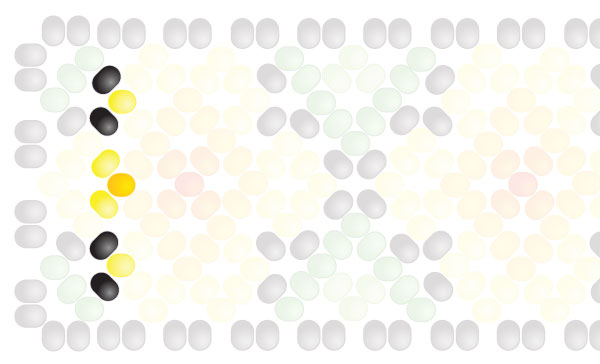

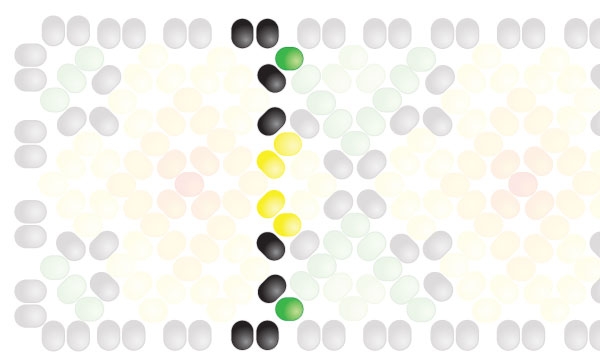
Row by Row Pattern
Click on the arrows to navigate row by row in the flower Huichol pattern. The first highlighted row is Row 12.
The pattern repeats, and the first row of the repeat is marked, so when you run out of steps, just advance until you find the right part of the pattern.
Finishing the Bracelet
Continue the pattern until the bracelet is approximately the right size. With this smaller repeat, this bracelet style is easy to size, but you don't want a lot of play in the size. You'll want to make sure that the finished bracelet has a gap of about 3/8" – 1/2" when wrapped around the wrist, which will accommodate the ball and loop closure. I'll post instructions for the closure later, but you can use any standard closure.
Video Tutorials
Click to play the videos, then look for the YouTube logo on the lower right-hand side of the video to view full-size on YouTube.
Alternate Method Version 1
In this video, I show the technique from this tutorial and a different method that doesn't require weaving back through the beads. It also demonstrates a method of tightening the work and making the "points" of the diamond stand out so it's easier to know where the previous row's bead is located.
This alternate method results in an edge that's not as straight, but it's much faster, especially on wider bracelets. One edge of the bracelet will be straighter than the other.
Alternate Method Version 2 & Adding New Thread
In this video, I show two additional techniques that don't require weaving back through—one requires a knot and is less noticeable, and the second loops around other threads but can be seen if there is a lot of contrast in your thread and your beads. My preference is the knotted version.
This tutorial also shows how to end a thread and start another one.
Using Your iPad or Android Tablet to Design
This video shows using a tap-to-color coloring book app called Recolor on the iPad, iPhone, or Android-based tablets or phones to design Huichol bead designs.
Save the PNG grid design below to your device, then import it into the app, resize as necessary, and tap to color!
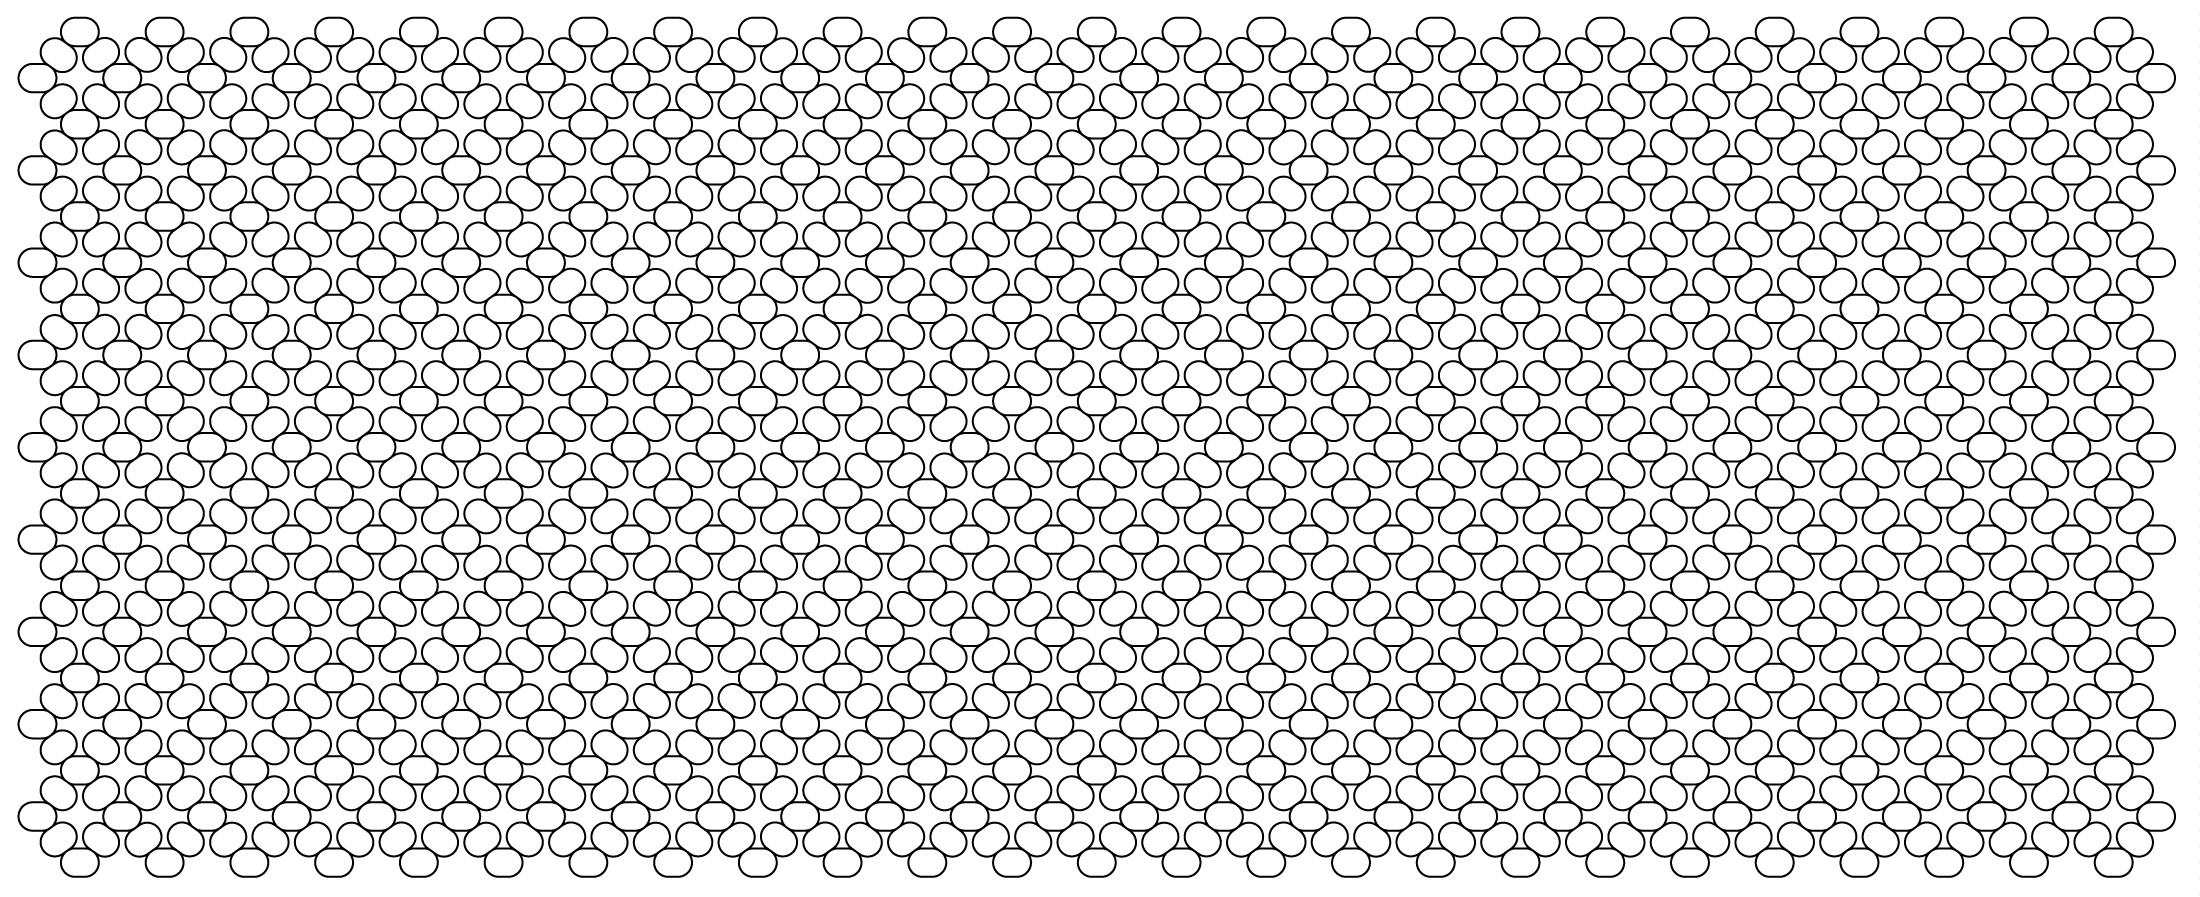
Click to view PNG file that can be saved and imported into Recolor app on iPad/Android tablet

Huichol Beading Design Grid in PDF
This full-page pattern sheet can be printed and colored with markers or pencils and is helpful in approximating the design after it's distorted in the beading process. It is a more accurate way of planning your design than on regular graph paper.
The graph paper does not take into account the double-bead "fringe" on the edges of the bracelet. These are added while beading.
The file is a PDF that can be printed, or you could import the PDF into other graphic design programs.